Story and Photo’s by Nick Nelson – ATV World Magazine
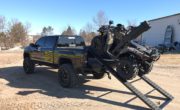
The Arctic Cat Wildcat hit the market in 2012 with mixed reviews. It was praised for awesome long travel suspension, a really cool exoskeleton chassis, and it’s thousand cc motor. Only to be criticized for mediocre clutching that wasted a lot of the big bores potential. Unfortunately the Wildcats clutching could not be cured by merely changing springs and weights. The 2012 and 2013 Wildcat shares the same wet clutch as the more utilitarian Prowler and Thundercat. This stock wet clutch design has proven reliable/durable over time, yet lacks in overall performance and tuneability. Slightly after the 2013’s hit the market, Arctic Cat dropped a new 2013.5 model that included a Comet type, or Polaris like dry clutch. The clutching on the 13 and a half Wildcat and Wildcat X proved to be much better than the previous set up.
If you happen to already have a 12 or 13 model Wildcat your still not completely SOL. Speedwerx has developed Wet Clutch Delete Kit that utilizes a Comet clutch very similar to the newer models or even the Polaris. This kit is highly tunable and removes more than 4.5 lbs. of rotating weight from the stock clutch. This huge reduction in rotating weight directly relates to improved seat of the pants feel, and quicker acceleration. With installation of this kit, the Wildcat gains 10mph on the top, improves acceleration, and feels like it picks up 25-30 hp. Unfortuneatly the kit costs around $1800, but then again buying a brand new machine isn’t cheap either.
Installation can be done with moderate mechanical ability and a few specialty tools. The necessary puller and alignment bar is included in the kit, but they don’t include a clutch compression tool. We were able to improvise with some tooling we had in the garage, but we would highly recommend you acquire one before attempting this install.
Step 1
1. Lay all parts out on a clean work bench. Take inventory and make sure you have everything necessary to complete the job. The Speedwerx kit comes with all the necessary gaskets.
Step 2
2. Start with a clean machine, on a level parking surface. Chock the front wheels, then jack up the right rear of the Wildcat. Remove right rear wheel and the shock.
Step 3
3. You will have to remove the clutch air intake tube mounting screws and mounting brackets to loosen the tube.
Step 4
4. Remove the belt cover retaining Torx bolts. We used a small impact with an extension, but a ratchet will do. With all the bolts removed, pull the cover out a few inches and then finagle the clutch cover around the intake tube. This is a tight fit. Be sure to account for the gasket and two alignment pins.
Step 5
5. You will need to remove the hose clamp securing the bottom of clutch air intake tube to housing. We removed this part of tube to make clearance for clutch pulley removal and used a nut driver on the clamp to loosen it easily.
Step 6
6. Remove the nut that secures the moveable drive face.”front clutch” This is done easily with an impact gun.
Step 7
7. Remove this “front” face and then remove the belt. Then remove the inner half of the front pulley”.
Step 8
8. Remove the rear nut securing the secondary “rear” clutch with an impact. Remove this clutch and the shims that are installed on the shaft behind it.
Step 9
9. Drain the Wildcat’s oil. This step is left out in the instructions, but you will have a mess if you skip it. Our oil was fresh so we set up a clean catch pan “funnel into oil bottle” to reuse the oil we drained from it. The Wildcat requires a special wet clutch specific oil, but will no longer after you install this delete kit.
Step 10
10. Remove all the cap screws that hold the inner belt housing to the engine casing, then remove the inner belt housing. Be sure to account for the two alignment pins and the gasket.
Step 11
11. Remove the cap screws that secure the one-way clutch cover(wet clutch). Remove the one-way “wet clutch” cover/clutch from the centrifugal clutch, making sure to account for the alignment pins.
Step 12
12. Press the one way clutch housing “wet clutch” from the cover. We used wood blocks to support the cover and a hammer to drive the old clutch out of the bearing/cover by the shaft.
Step 13
13. Remove the left hand thread nut, that secures the clutch shoe assembly to the crankshaft. This nut is installed from the factory with red Loctite and you will need heat from a torch and a impact wrench to remove it. Take note that it is left hand thread. Remove the clutch shoe assembly.
Step 14 Checking Clutch Offset
14. Install one of the provided 1.375 x1.00 x .020 shims onto the crankshaft, and then thread the new provided output shaft onto the crankshaft. Tighten to 20 ft. lbs. “left hand threads”. Install the new primary clutch assembly onto the new pilot shaft.”torque to 50 ft lbs.” Install the secondary clutch with nut hand tight to prevent wobbling. Insert the clutch alignment bar between the drive clutch sheaves..
Step 15
Drawing/Diagram showing clearances
15. Allow the bar to rest on the drive clutch shaft and against the outside edge of the driven pulley stationary sheave. With the bar at points A & B in the Diagram, the bar should just clear the inside edge of the stationary shaft at point C. If this bar doesn’t clear the inside edge or has more than .020 clearance, the offset must be corrected. You can correct this by adding or taking away shims from behind the output shaft. Extra shims are provided should you need to adjust this offset.
Step 16
16. Once the alignment/offset is correct, remove the temporarily installed, new primary clutch, with the provided puller.
Step 17
17. Remove the three 5/16″ flange bolts from the output shafts locking mechanism and re-install with red Loctite. Torque them to 17 ft. lbs. Make sure bolts are free of any oil or contaminants.
Step 18
18. In order to replace the inner clutch cover seal, you will need to first remove the bearing. You will need to first remove the two bearing retainer plates and screws from the cover.
Step 19
19. You will need to press or knock the bearing out before you can replace the seal. If you heat the cover to 200 degrees, the bearing will tap right out. We drove it out with a large socket and a extension. Drive out the seal as well. With the stock seal removed, you can install the new provided seal. A light coat of grease around the outside of seal will ease installation. Speedwerx provides a seal driver sleeve to help with this as well.
Step 20
20. With the new provided seal installed flush, you can now reinstall the bearing. We used the same hammer and extension with large socket to drive it into place. Be sure to work around the bearing from side to side evenly, driving it in flush and square. Replace the bearing retainer plates and screws.
Step 21
21. Replace the inner clutch cover onto the engine and over the output shaft and replace all the cap screws. Make sure you remember the alignment pins and new gasket. Install the inner clutch belt housing and all cap screws.
Step 22
22. Install the new provided helix and secondary spring into the secondary clutch with the spring indexed to “B-2”. Be sure to add .120″ of provided secondary shims in-between the two sheaves. Be sure to wind the spring so that the ramp is pre-loaded to the drive side of the helix. You will need a clutch compression tool to easily remove the cir clip and disassemble the secondary clutch for spring/helix replacement.
Step 23
23. Install the new primary clutch, secondary clutch and the belt. Start with belt already on both clutches and then slide them into place. Check for proper belt deflection” slop in belt” at this time. Should be 1″ to 1.25″ of deflection, this can be adjusted by adding or subtracting shims between the secondary clutch sheaves.
Step 24
img 5174 or 5172
24. Install the nut on secondary clutch with red Loctite and torque to 80 ft lbs. Then tighten the primary clutch allen bolt to 50 ft. lbs. “left hand thread”
Step 25
25. Reinstall the new or “Speedwerx modified” clutch belt cover. Be sure to install new belt cover gasket and alignment pins. Torque the cover screws to 8 ft. lbs. Re-install the intake tube, brackets and the rear shock. Reinstall the rear wheel. Be absolutely sure to replace the engine oil that you drained in step 9.
For more info check out www.speedwerx.com or call them at 651-982-6020


The Best Service Manuals Online !
20% Off On All Store !
Visit Us At:
RepairManualMaster.com
Your article helped me a lot, is there any more related content? Thanks!
buy generic lipitor over the counter buy lipitor generic order lipitor without prescription
cipro 1000mg usa – cheap bactrim 960mg buy augmentin 375mg generic
purchase baycip without prescription – buy keflex generic buy augmentin 625mg pills
flagyl 200mg pill – cleocin cost buy azithromycin no prescription
order ciprofloxacin 500 mg without prescription – doryx uk erythromycin 500mg price
valacyclovir us – order starlix 120mg online cost acyclovir 800mg
stromectol tablets buy online – cefixime medication how to get tetracycline without a prescription
cheap metronidazole 200mg – amoxicillin price azithromycin online buy
buy cheap generic ampicillin purchase ampicillin without prescription buy amoxil pills
buy lasix generic – buy tacrolimus 5mg without prescription captopril 25 mg brand
order metformin 1000mg online cheap – cefadroxil 500mg generic buy lincocin medication
retrovir generic – brand zyloprim 300mg zyloprim 300mg over the counter
order clozapine pill – buy altace 10mg pill buy famotidine tablets
buy seroquel 50mg without prescription – purchase eskalith generic buy generic eskalith over the counter
order atarax online cheap – buy lexapro 20mg pills endep 10mg usa
order anafranil 25mg sale – aripiprazole sale buy sinequan 75mg online
cheap amoxil online – purchase cefadroxil online ciprofloxacin cost
clavulanate tablet – ethambutol 1000mg over the counter cipro 1000mg us
buy clindamycin medication – order oxytetracycline 250mg online cheap order chloramphenicol without prescription
zithromax 500mg oral – oral ciprofloxacin 500mg order ciprofloxacin for sale
cheap albuterol – buy fexofenadine 120mg without prescription theo-24 Cr over the counter
ivermectin canada – cheap doryx online buy cefaclor 500mg
clarinex canada – albuterol over the counter order albuterol inhalator sale
methylprednisolone 16mg over counter – zyrtec cheap buy generic azelastine 10 ml
glyburide ca – order glipizide generic dapagliflozin 10 mg usa
repaglinide brand – buy empagliflozin 10mg online buy cheap jardiance
glycomet 500mg drug – hyzaar online buy how to get precose without a prescription
order terbinafine 250mg – buy generic griseofulvin online purchase griseofulvin
brand semaglutide 14 mg – purchase DDAVP without prescription purchase DDAVP generic