Story and Photos by Nick Nelson – ATV World Magazine.
The Rectangular base tubes found on the bottom of both the RZR 800 and XP900 chassis are notoriously weak. One hard crash, or repeated hard poundings in the whoops is all it takes to start bending these very thin wall tubes. With repeated abuse, the chassis tubes will start to arc upwards in the back and your frame cross members will end up closer and closer to the drive shaft. If you drive your RZR very aggressively or especially if you are racing it, you will need to reinforce these tubes.
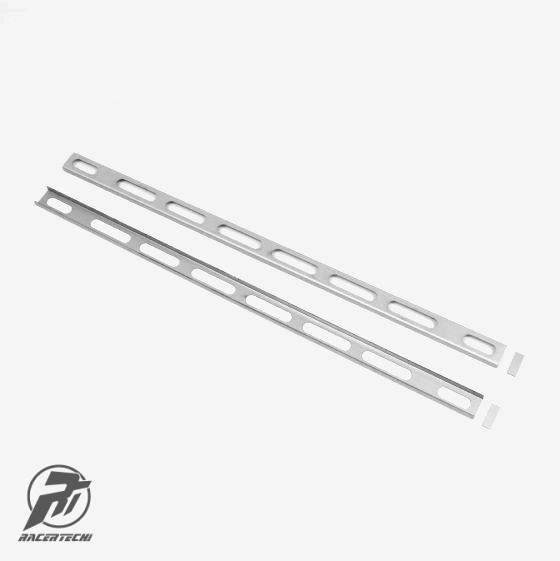
The trick is to reinforce them with these Racer Tech Chassis Sleeves before it starts to bend. Our chassis had been through two seasons of whooped out WORCS races and the base tubes were severely bent already. For this reason, we will be demonstrating the install on a new replacement chassis, but you can mount them just the same on your complete car.
The chassis sleeves are available from www.goracertech.com and will fit inside the lower frame rail of any 2 seat RZR 800, or RZR XP900. The XP900 4 and RZR 4 are also problematic in this area, but a different Racertech weld on rail gusset kit is required to update the 4 seat versions. The chassis sleeves are designed to be pounded into the rear of the frame, just ahead of the rear wheels. The sleeves are a very tight fit and you can actually pound them in and then drill through the frame to bolt them in if you don’t have access to a welder.
The bolt method will work fine, but plug welding the sleeves in place is the strongest and preferred method. With my expert welder friend Doyle Collins dying to fire up his welder in the middle of the summer, we decided to do it the proper way.
Take Measurements
Lay your Chassis sleeve out and take measurements, writing down four spots that will land centered on the metal rail, avoiding the lightening holes. Write down these numbers for a reference.
Mark It Out
Pulling your tape from flush on the end of lower frame rail, mark out the frame at your measurements with a soapstone.
Make Adjustments If Needed
On the RZR XP900 we found our third measurement to land in a difficult spot to weld, so we measured a new third number for a different solid spot on the chassis rail. The new measurement worked fine.
Find The Drill Points
Using a square, mark the center line of all your of your measurement points. Your drill point should be centered in the frame rail from top to bottom. Use a center punch to help center the drill bit.
Start Drillin’
We pilot drilled all four holes first with a smaller drill bit. We then went back and drilled all four holes with a half inch drill bit.
Clean The Surface
Use a grinder with a flapper wheel or a wire wheel to remove any paint from around the holes where you will be welding.
Slide The Sleeve In
Slide the chassis sleeve into the frame. The C part of sleeve will face toward the center of the car. It will stop part way in and you will need to hammer it in with a dead blow or small sledge.
Time To Plug Weld
With the chassis sleeve in flush to the end of frame, carefully plug weld all four of your holes that you drilled. Plug welding is just welding up the inside of your hole to the sleeve material.
Clean And Cap It
Clean up the open end of frame rails, then place the supplied end caps over the open frame end and weld them in, sealing up the lower frame rail.
Paint It
Use a matching spray paint to cover all the bare metal, which is important to keep rust at bay. Repeat this whole process for the other side and your chassis will be ready for some serious abuse.


