
Story and Photos by Nick Nelson – ATV World Magazine
If you log enough hours on an IRS ATV wearing out or breaking CV axles, joints or boots is one of those things that is bound to happen. While it is not a fun chore, it’s not rocket science and I’m sure that most of you could take it on with minimal patience and a decent set of hand tools. Replacing dry, cracked or torn CV boots is the most common example of this job, as the rubber boots tend to dry up with age and exposure to the elements. A torn boot will quickly leak the grease out and dirty contaminants will get in, prematurely wearing out the CV Joint. We will show you in detail the process for replacing a torn CV boot on a rear Rhino axle. This same process will be used to replace a broke axle, or cv you will just need to sub in the new parts when the axle is dissasembled.
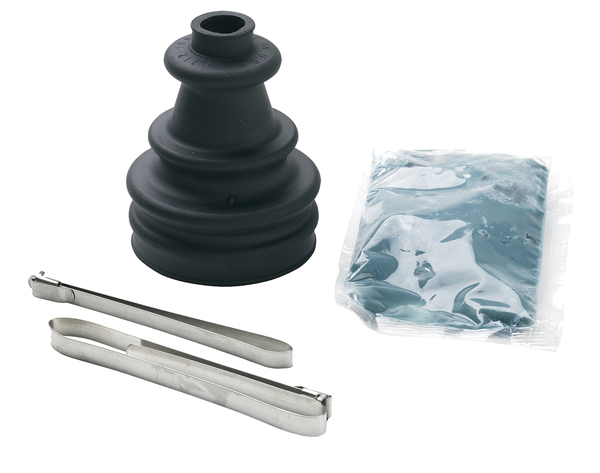
We demonstrated this on a Yamaha Rhino rear axle, but it is very similar on any IRS rear axle or front 4wd axle. The major difference being the process and tools required to remove the culprit axle from the ATV or UTV. Please check out EPI Performance for replacement boot kits, CV rebuild kits, or even replacement CV axles “wheel shafts”. They have all the parts and tools you could need to fix your CV problems in stock and ready to ship. www.erlandsonperformance.com

Acquire the following supplies before starting this project.
- Tools required to remove complete axle from ATV.
- Service manual is very handy to aid in axle removal
- Lots of rags and brake parts cleaner and trash can
- Rubber gloves
- Rubber or brass dead blow hammer
- large vise not required but handy
- Razor Knife/Dikes
- Flat Blade Screwdriver
- Grease gun
- CV clamp banding tool “available from EPI Performance”
- EPI boot replacement kit and/or whatever else is busted
Step 1

The first and sometimes most difficult step is to remove the culprit axle assembly. Start with a clean machine to avoid dirt entering rear end. Revert to your manual, but typically you will need to remove outer axle nut, then remove the hub and spindle assembly. With the outer spindle/hub out of the way, you should be able to yank the axle/CV out of the rear end housing. Might take 2-3 popping motion pulls.
Step 2

Line a large flat bench or floor space with rags or towels as it will get a little messy. Wearing rubber gloves cut the cv boot bands off both sides of the boot or CV that you will be replacing. As most cv boot kits come with both the inner and outer, we suggest that you replace both boots if you are already disassembling the axle.
Step 3

Slide the boots back off of the CV and toward the middle of the axle. This may require a little prying with a small flat blade screwdriver to loosen the boot from the CV. Use a rag to wipe away as much excess grease as you can at this point.
Step 4

If you are replacing the axle or inside CV then you will need to remove it as shown in step 4-7. If not you can skip to removing the outer cv and replace both boots from that end. Use a small pick or flat blade to remove the retainer cir clip from the CV joint.
Step 5

Be sure to clean and layout everything you remove in the correct order. Remove the axle and race from the inner axle stub. Wipe away grease
Step 6

Use cir clip pliers to carefully remove the cir clip that retains the CV race onto the axle. Remove the axle from the bearing. Clean all parts and keep them in the correct order.
Step 7

If you axles were loud, loose, clicky or noisy then this is the time to inspect the inner CV for damage. Use screwdriver to rotate the center splined piece enough to remove the ball bearings one at a time. Clean and inspect all surfaces for cracks, or pitting. Grease and reassemble the race if it has no issues, or replace any damaged parts.
Step 8

Removing the outer axle stub. With our inner removed we could use a hole cutout in the workbench for disassembly. If you are leaving your inner assembly on the axle, use the open jaws of a large bench vise against the housing in the same manner. You are compressing a cir clip enough to pull it through the housing. If you don’t have a vise, this can be done with a hammer against the housing.
Step 9

This is the cir clip you were popping through the housing. If it is damaged you should replace it. In a pinch you can close a slightly loose one by removing it from the axle and pinching it shut in a vise. Clean the axle thoroughly.
Step 10

Pack the clean axle stub full of fresh CV grease, the proper grease will be supplied with the new boots. Slide both CV boots onto the axle in the correct direction. They are usually different from inner to outer, so be sure to get them orientated in the right way.
Step 11

With the boots and the clip installed on the axle use a screwdriver to align and compress the clip properly into the axle housing. You might be able to push the axle in with the screwdriver working the clip, but you will probably need to drive it in.
Step 12

With the axle stub housing held in a table hole or vise, use a dead blow hammer to drive the clipped axle into it’s housing. If you don’t have a vise, you may want a friend to help you hold the axle so that you can drive the housing onto it, opposite of how we did it in the photo. The axle will clip securely into the axle housing.
Step 13

If you removed the inner cv, Flip the axle over and install the freshly greased joint onto the axle. Slide the joint all the way onto the axle so that you expose the groove for the cir clip. Use cir clip pliers to install the retainer cir clip.
Step 14

Pack the inner housing full of fresh grease, then slide the axle with joint into the housing. You will need to align the ball bearings with their respective grooves. Install the retainer cir clip, making sure that it seats into it’s groove.
Step 15

Pack both boots with additional grease and then slide into place. This can be a tight fit and might require a little bit of force. Try to keep the outer housing and inner flange clean and free of excessive grease. Using the EPI banding tool or most any automotive band tool to tightly install the boot bands. We have seen hose clamps used for this, but it is a temporary fix, if your taking the time to do this, get the tool and do it right.
Step 16

Install the freshly rebuilt CV into your machine. It will take a little pop or force to get the inner stub to seat into the rear end. Install the spindle and hub onto the outer axle end and reattach to the a arms. Torque the outer axle nut to factory specs, and be sure to peen in any retainer in the nut.


The Best Service Manuals Online !
20% Off On All Store !
Visit Us At:
RepairManualMaster.com
Can you be more specific about the content of your article? After reading it, I still have some doubts. Hope you can help me.
order lipitor 10mg lipitor 80mg usa order atorvastatin 10mg online
buy ciprofloxacin 1000mg online – brand augmentin 625mg amoxiclav sale
buy cipro 500mg sale – buy bactrim 480mg sale order augmentin 625mg online
purchase metronidazole sale – cheap generic amoxicillin zithromax 250mg oral
buy ciprofloxacin 500mg – doxycycline us order erythromycin generic
valacyclovir 1000mg ca – order nateglinide for sale order zovirax 400mg generic
ivermectin 6 mg tablets – sumycin 250mg usa order sumycin
metronidazole online – buy azithromycin online cheap zithromax 250mg sale
ampicillin sale acillin where to buy cheap amoxil for sale
buy furosemide 100mg without prescription – atacand 16mg pills buy captopril 25mg without prescription
buy metformin 1000mg online cheap – order cefadroxil 500mg pill lincocin 500 mg over the counter
order zidovudine for sale – rulide 150mg uk where to buy zyloprim without a prescription
buy clozaril 100mg generic – how to buy clozaril order pepcid 40mg generic
order quetiapine 50mg pill – luvox 100mg cheap buy generic eskalith for sale
order clomipramine 25mg – cymbalta 20mg sale doxepin online buy
purchase hydroxyzine without prescription – buspin online order order endep without prescription
augmentin where to buy – ethambutol drug buy generic ciprofloxacin over the counter
buy amoxil generic – purchase trimox order cipro 500mg generic
cleocin uk – doxycycline online chloromycetin order
buy zithromax – buy generic flagyl ciprofloxacin pill
stromectol oral – order eryc pill cefaclor price
albuterol price – fexofenadine 120mg pill theo-24 Cr 400 mg over the counter
buy generic methylprednisolone over the counter – order fml-forte generic oral astelin
order clarinex online cheap – buy ketotifen 1mg buy albuterol 2mg pills
buy micronase generic – purchase pioglitazone generic dapagliflozin generic